Reverse Tunneling with Firezone
This guide will walk through using Firezone as a relay to connect two devices. A typical use case for this configuration is to enable an administrator to access a server, container, or machine that is normally behind a NAT or firewall.
General case: node to node
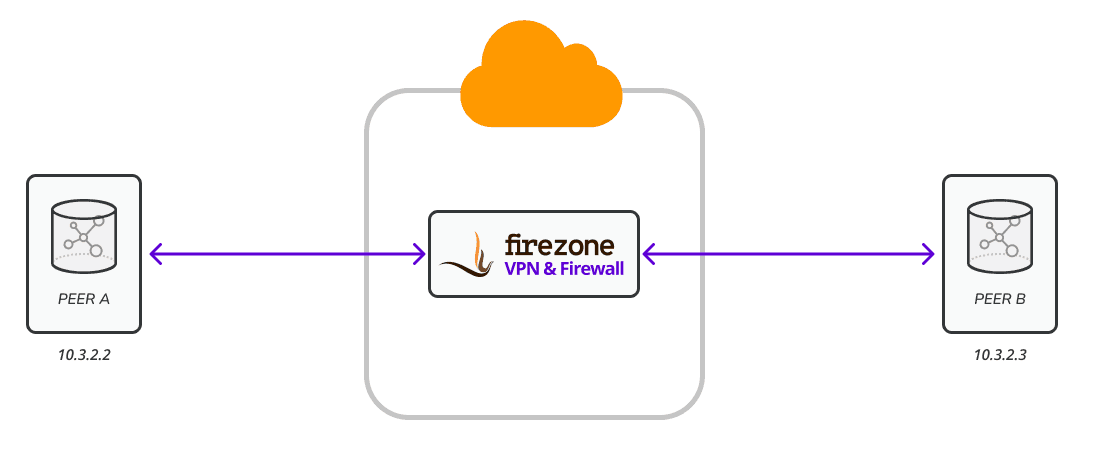
This example demonstrates a simple scenario where a tunnel is established between Device A and Device B.

Start by creating Device A and Device B by navigating to
/users/[user_id]/new_device. In the settings for each device, ensure the
following parameters are set to the values listed below. You can set device
settings when creating the device config (see
Add Devices). If you need to update settings on
an existing device, you can do so by generating a new device config.
Note PersistentKeepalive can also be set in on the /settings/defaults page
for all devices.
Device A
AllowedIPs = 10.3.2.3/32: This is the IP or range of IPs of Device BPersistentKeepalive = 25If the device is behind a NAT, this ensures the device is able to keep the tunnel alive and continue to receive packets from the WireGuard interface. Usually a value of25is sufficient, but you may need to decrease this value depending on your environment.
Device B
AllowedIPs = 10.3.2.2/32: This is the IP or range of IPs of Device APersistentKeepalive = 25
Admin case: one to many nodes
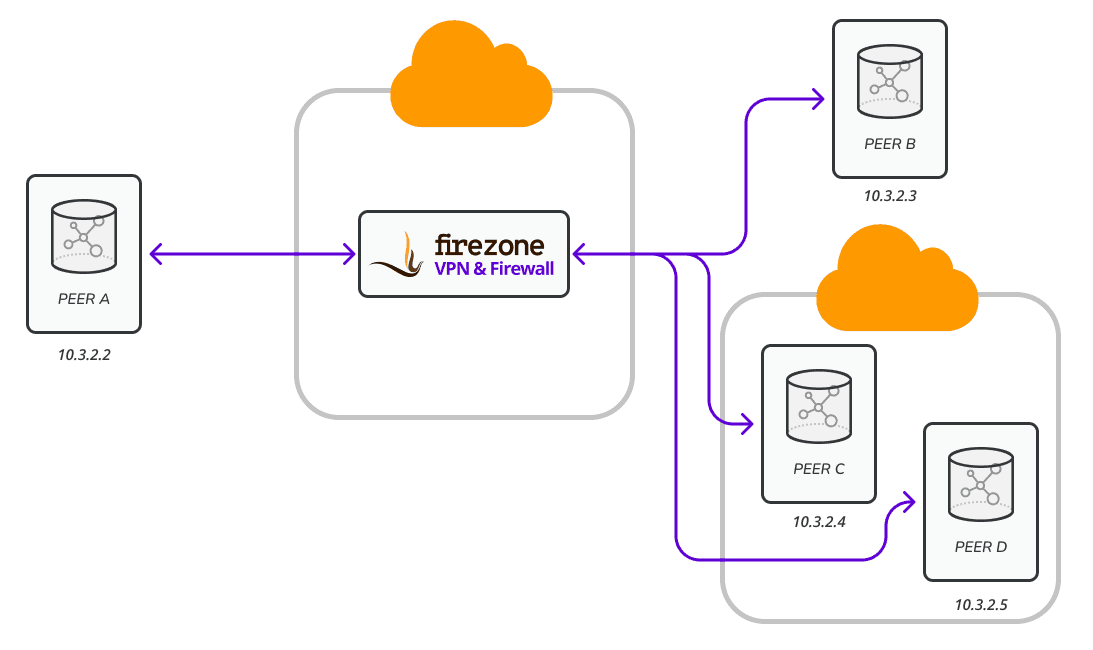
This example demonstrates a scenario where Device A can communicate bi-directionally with Devices B through D. This configuration could represent an administrator or engineer accessing multiple resources (servers, containers, or machines) in different networks.

In the settings for each device, ensure the following parameters are set to the values listed below. You can set device settings when creating the device config (see Add Devices). If you need to update settings on an existing device, you can do so by generating a new device config.
Device A (Administrator Node)
AllowedIPs = 10.3.2.3/32, 10.3.2.4/32, 10.3.2.5/32: This is the IP of devices B through D. Optionally you could set a range of IPs as long as it includes the IPs of Devices B through D.PersistentKeepalive = 25If the device is behind a NAT, this ensures the device is able to keep the tunnel alive and continue to receive packets from the WireGuard interface. Usually a value of25is sufficient, but you may need to decrease this value depending on your environment.
Device B
AllowedIPs = 10.3.2.2/32: This is the IP or range of IPs of Device APersistentKeepalive = 25
Device C
AllowedIPs = 10.3.2.2/32: This is the IP or range of IPs of Device APersistentKeepalive = 25
Device D
AllowedIPs = 10.3.2.2/32: This is the IP or range of IPs of Device APersistentKeepalive = 25